Table of Contents
ToggleLiving room shelving isn’t just about storing books and knickknacks, it’s a chance to transform a blank wall into a focal point that reflects personal style while keeping clutter at bay. Whether someone is working with a cozy apartment or a sprawling family room, the right shelving solution can make the space feel intentional and curated. From sleek floating shelves to custom built-ins, today’s options balance form and function better than ever. This guide walks through practical shelving ideas, installation considerations, and styling tips to help DIYers and homeowners build a living room that’s both beautiful and organized.
Key Takeaways
- Living room shelving ideas transform blank walls into functional focal points that reflect your personal style while maximizing storage and organization.
- Floating shelves provide a modern, clean aesthetic but require secure anchoring to wall studs with proper brackets; most can safely hold 25–50 pounds depending on length and bracket quality.
- Wall-mounted modular systems and ladder shelves maximize vertical storage in small spaces without consuming floor area, making them ideal for apartments and tight layouts.
- Built-in shelving offers a premium, custom solution that integrates seamlessly into room architecture, though installation requires moderate to advanced DIY skills or professional help.
- Styling your shelves with the rule of three, varied heights, mixed textures, and breathing room transforms storage into a curated display that feels intentional and sophisticated.
- Proper installation, thoughtful organization with baskets and bins, and maintenance planning ensure your shelving solution remains both beautiful and functional for years.
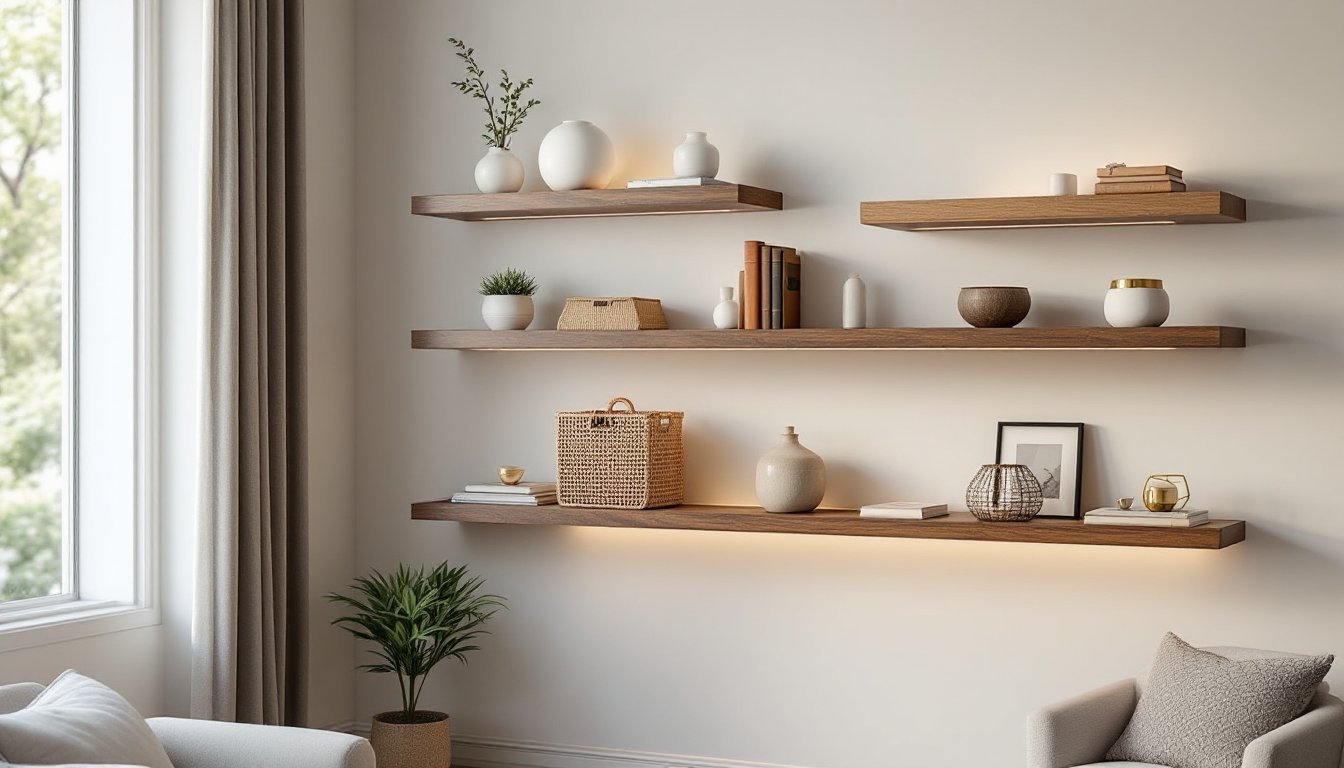
Floating Shelves for a Modern, Clean Look
Floating shelves deliver that contemporary, minimalist aesthetic without visible brackets or support legs. They appear to hover against the wall, creating a sense of lightness and openness that works in small and large rooms alike.
Installation basics: Floating shelves rely on a hidden bracket system, typically a metal rod or rail mounted directly to the wall studs. A stud finder (magnetic or electronic) is essential here: mounting into drywall alone won’t hold weight safely. Most floating shelves are 12 to 24 inches deep and come in lengths from 24 to 60 inches.
The hidden bracket must anchor to at least two studs, usually spaced 16 inches apart (on-center). A level is non-negotiable. Even slight tilting becomes obvious when items sit on the shelf, and dishes or books will slide off. Use ½-inch lag bolts or structural screws, not standard drywall anchors, for anything beyond decorative weight capacity. Pre-drill holes to prevent wood splitting, especially in narrower shelves.
Material options: Walnut, oak, or pine are common choices, though composite materials (MDF or engineered wood) with a veneer finish offer cost savings and stability. Solid wood shelves thicker than 1.5 inches look more substantial and better resist sagging under weight. A 48-inch shelf holding typical book and decor weight can sag noticeably over years if undersized.
Weight limits: Most commercial floating shelf kits specify 25–50 pounds per shelf, depending on the bracket quality and span. Longer shelves sag more easily, a 60-inch floating shelf can’t safely hold what a 24-inch one can. Distribute weight evenly: don’t stack all the heavy items on one end.
DIY difficulty: Moderate. Locating studs and drilling level pilot holes takes patience, but the installation itself is straightforward. Renting a stud finder ($5–10 per day) beats guessing.
Wall-Mounted Shelving Units for Small Spaces
When floor space is tight, wall-mounted systems maximize vertical storage without eating into the room. These modular units come in various configurations, single columns, grid patterns, and ladder-style arrangements, and can be adjusted or reconfigured as needs change.
Types and configurations: Track-mounted systems use a vertical rail anchored to the wall studs, then individual shelves slide into place. This design lets users move shelves up or down without drilling new holes. Wire shelving units, common in closets, work in living rooms too if styled thoughtfully, pairing them with woven baskets or fabric-backed panels masks their utilitarian origin.
Ladder shelves are another compact option: narrow, angled frames holding 3–5 shelves. They lean against the wall (or mount for stability) and fit snugly in corners or against alcoves. Weight capacity is typically 15–30 pounds per shelf, suitable for books and lighter decor but not heavy collections.
Anchoring considerations: All wall-mounted units must be anchored to studs or use heavy-duty toggle bolts or molly bolts if studs aren’t available. For drywall alone, use at least two anchors per shelf or bracket. Verify the manufacturer’s weight rating, especially important in households with kids or pets who might grab or climb.
Space efficiency: A 4-foot-tall wall-mounted unit takes up minimal floor footprint but can hold as much as a 3-shelf bookcase. Measuring the space and choosing a unit width (18–48 inches typical) that complements the wall without overwhelming it is key. Offset multiple units for visual interest rather than centering one large unit.
DIY difficulty: Easy to moderate. Most units ship pre-assembled: installation is mainly drilling the rail brackets level and securing to studs.
Built-In Shelving for Custom, Permanent Solutions
Built-in shelves are the premium option, custom-fitted to a wall, they become part of the room’s architecture and offer unmatched flexibility in sizing, depth, and finish.
Planning and design: Built-ins typically frame around a door, window, or fireplace, or fill an entire wall. Shelf spacing depends on what’s stored: books need 8–10 inches: bulkier decor and storage boxes may need 12–16 inches. Standard shelving width is 10–12 inches deep (nominal), though deeper shelves (14–16 inches) accommodate larger items.
Sketching the layout on graph paper or a digital tool (free options like Canva or SketchUp) helps visualize spacing and proportions before cutting a single board. A level and measuring tape are constant companions.
Structural approach: Built-ins consist of vertical studs or stringers (rails) and horizontal shelves supported by cleats (small horizontal brackets) mounted to the studs or by shelves inserted into dados (grooves routed into the stringer edges). Dados require a router and steady hands, cleats are the more forgiving approach for DIYers.
If the wall has limited stud placement, blocking (horizontal lumber) can be installed between studs to provide mounting points for cleats. This is structural work: fastening must be solid.
Materials and finishing: Pine and plywood work well: paint grade or stain finish. Face frames (the front border) and back panels are optional, they hide the internals and look more polished. Priming all surfaces before final paint prevents blotchy absorption and ensures even color.
DIY difficulty: Moderate to challenging. Routing dados or installing multiple cleats level and plumb takes skill and patience. This is a weekend or multi-week project, not an afternoon job.
Permits: Built-ins don’t typically require permits unless they’re part of a load-bearing wall alteration or span a large structural opening. Check local codes.
Styling Your Shelves: Balance, Color, and Texture
Even perfectly installed shelves will feel off if they’re overcrowded or randomly arranged. Styling is the difference between a storage unit and a curated display.
The “rule of three” and spacing: Group items in odd numbers (3 or 5) rather than pairs, it feels more natural. Leave breathing room: don’t pack every inch. A mix of vertical (stacked books, framed prints) and horizontal items (vases, boxes) creates visual rhythm. Alternate tall and short objects: vary depths by staggering items forward and back.
Color and tone: Repeat colors throughout the shelf lineup to unify the display. If the room has a neutral palette, one or two accent colors in decor items tie the shelves to the broader design. Books with similar spine colors create a calm, monochromatic look: a colorful mix feels eclectic. Avoid monochrome shelves, they read as monotonous. A mix of wood tones, metals, and painted surfaces keeps interest.
Texture layering: Pair smooth ceramics with woven baskets, matte finishes with glossy accents, and rough wood with polished metal. This contrast makes the shelves feel intentional rather than accidental. Plants (real or quality faux) add organic softness and break up hard edges.
Negative space matters: Leaving some shelf space empty is not a failure, it’s restraint and balance. Crowded shelves feel chaotic: a few well-chosen pieces on open shelving read as sophisticated.
Storage and Organization Tips for Functional Shelving
Style and storage must coexist. Hidden storage solutions keep clutter out of view while displaying curated pieces.
Baskets and bins: Woven baskets, wooden boxes, and fabric-lined containers corral loose items (magazines, remotes, blankets) while adding texture. Measuring shelf width and depth beforehand ensures the right fit. Label small bins if contents aren’t obvious, especially in shared living spaces.
Book organization: Shelve books spine-out for clean lines, or mix spine-out and flat-stacked books on taller shelves to vary visual texture. Group by color, genre, or author, consistent logic helps anyone find what they need. Bookends prevent toppling on narrower shelves.
Accessibility: Frequently used items belong at eye level: decorative or seasonal items can go higher or lower. In households with children or pets, avoid placing heavy or breakable objects on upper shelves where falls are risky.
Dust and maintenance: Shelves collect dust quickly, especially above electronics or fireplaces. Wipe-clean finishes (laminate, sealed wood) are easier to maintain than porous surfaces. Dust more often, or choose dust-resistant display pieces (closed vessels, glass covers).
Cable and cord management: If shelves are near electronics, plan for hidden wiring. Adhesive cable clips or sleeves route power cords and HDMI cables behind the shelf structure or along the wall, hidden from view.
Material and Design Choices to Elevate Your Space
The materials and finishes chosen for shelving shape the entire look of a living room.
Wood species and finishes: Solid wood (walnut, oak, cherry) commands higher cost but ages beautifully and feels substantial. Engineered options (plywood with veneer, MDF painted or stained) offer budget-friendly alternatives with less risk of warping. A clear polyurethane or satin finish protects stained wood and adds subtle sheen: matte or satin paint finishes feel more contemporary than glossy ones.
Metal accents: Steel brackets, iron railings, or brass hardware introduce industrial or vintage charm. Matte black is trendy and hides fingerprints better than polished finishes. Stainless steel works in modern spaces: wrought iron in transitional or farmhouse settings.
Marble, glass, and stone: These higher-end materials catch light and add luxury but require sturdy support and careful maintenance. Glass shelves must be tempered for safety (minimum 6mm thickness) and show fingerprints and dust readily. Marble and stone are heavy: brackets must be rated for the load.
Coordinating with room style: Living rooms with mid-century modern decor pair well with walnut shelves and minimal decor. Industrial spaces suit raw wood, black metal, and concrete-look finishes. Traditional rooms benefit from deeper wood tones and ornate brackets. The shelving should feel intentional, not an afterthought.
Lighting: Adding small LED strip lights under shelves highlights the display and extends functional lighting into the room. These are low-profile, generate minimal heat, and can be hardwired or plug-in. Battery-operated options exist but require frequent replacement.
Conclusion
Living room shelving is a practical investment that pays dividends in both storage and aesthetics. The right choice depends on the space, budget, and vision: floating shelves for sleek minimalism, modular systems for flexibility, or built-ins for a custom fit. Success comes down to solid installation, thoughtful styling, and honest assessment of what needs to be stored and displayed. Take time with measurements, anchoring, and level placement, poor installation undermines even the best design. Once the shelves are up and styled, they’ll anchor the room and serve for years.